BLOGGER TEMPLATES AND TWITTER BACKGROUNDS

Monday, October 3, 2011

Day 3 - The Cat in the Hat


This was an easy peasy costume, because I already had the main ingredients. The only things I had to buy were the white gloves and red bowtie, which I got from a dollar store. Of course, not everyone has a Cat in the Hat hat lying around. I have had it for years, it's just a random item I bought because I knew it would be handy one day. I tend to do that a lot. That's why I have so much stuff.
So, once you have the hat, gloves and bowtie, all you need are some black and white clothes. And if you wanted to be more authentic, you could add face paint - White face, black nose and whiskers. I also should have had a black tail, and I tried to find one, but with no luck, so I will keep an eye out for one in the future.

This is a really good time of year to find a few key items to put away for when you may need a costume, being Halloween month. Just about anywhere you go has Halloween stuff out at the moment, but as I said earlier, Halloween isn't a big thing here, so after Halloween you can go buy stuff on clearance for next to nothing. Hats or head accessories are always good to have, because you can usually put together a costume to go with a hat from normal everyday clothing items.

Sunday, October 2, 2011

Day 2 - 1920's


This is a costume that I have put together for a function we have to go to at the end of the year, Hubby's work are having a 1920's murder mystery night for their Xmas function.

This was put together mostly with stuff I already had in my wardrobe & jewellery box.
The skirt and top were mine. I got the little cardi to go over the top from a thrift store. The shoes I bought ages ago from a thrift store because they are vintage and really comfortable. The necklaces, bracelets and rings I already had. I made the headpiece from some trim, feathers, fabric, chain and a brooch I already had in my stash. So in total I only spent $2.00 on this costume. Obviously not everyone has pieces in their wardrobe that could fit into this theme, but these things are easily found at a thrift store. So many ready made 1920's costumes are the shiny flapper dresses, but the fashion of the time is really beautiful, and looks good on just about any body shape, I think.

To see my inspiration for this costume, check out my 1920's board on Pinterest.

Saturday, October 1, 2011

Day 1 - Steampunk

My latest obsession, thanks to Pinterest, is Steampunk. The way I like to think of it is a combination of Victorian/lacy/frilly & futuristic/mechanical/metal. I desperately wanted to create a Steampunk costume, but I really had no reason to. I considered having a halloween party just so I had a reason, but I'm not much of a party host. Then, in the process of looking through all my stuff to put this costume together, I realised I have a lot of dress up stuff, and the idea for a month of costumes was born.


Components:
Tulle petticoat - found at funky junk (free) and altered to fit.
Dress - something I've had for years.
Waistcoat - from the $1 rack at the thrift store.
Belt - dollar store.
Handbag - already had.
Boots - already had.
Leather clutch (attached to belt) - thrift store.


Accessories:
Headpiece - made by me from bits & pieces I had in my stash of Junque; a clock-face out of an old alarm clock, bits of lace and tulle, an old key, a fabric flower, feathers.
Mono-goggle - made by me from handbag straps, hose connecter, magnifying glass lens, elastic.
Wrist cuff - made by me from bits and pieces I had in my stash; fake fur, lace & trims, buttons, a doily, random charms and bits of watches (including a functioning watch, so I can actually use it to tell the time).
Necklaces - cameo necklace from thrift store but altered by me, random chains put together with some things hanging off; a bullet that came on a keyring from dollar store, a huge nut and bolt I found in my stash, butterfly charm, and a few other random little things.

Another little detail you can see in some of the close up photos is the shoulder hooks. I sewed metal rings onto the shoulders of my dress, then metal hooks on chains onto the shoulders of my waistcoat, so the hooks can attach to the rings. This is actually a functional feature, because the dress is a bit loose and the shoulders kept falling down, so the hooks on the waistcoat hold it up.

To see my inspiration for this costume, check out my Steampunk board on Pinterest.

Friday, September 30, 2011

A month of costumes

Starting tomorrow, the 1st of October, I'm going to start something here. October is going to be "the month of costumes" over here on my poor neglected blog. I'm doing this for a few reasons; I love Halloween, and I have always been quite sad that here in NZ Halloween is not a big thing, in fact its almost not a thing at all; I really need to get back into the blogging groove, I lost my mojo a while back and it's been hard to find it again; I just HAD to make a costume for my latest obsession, steampunk, but had no valid reason to justify making it, so I had to make one up; and most of all, I just love playing dress ups.

So each day I will post photos of me (cringe) dressed up in a costume that I created/put together, mostly from stuff I already have plus a few things picked up from a dollar store or thrift store.

What's the point of this? Well, it's really just a challenge for me, to post on the blog everyday, to come up with 31 costumes, and to finish something I started. But I hope it will also inspire some readers to have fun with costumes, instead of just walking into a costume/fancy dress hire shop and getting someone else to find a costume for you. I want to show how easy it can be to put together a fun costume for just about any event, without spending a fortune. Another aspect of it that I hope will be helpful is the plus size factor, because I am a plus size "model" all the costumes I show will obviously be plus size appropriate. It has always annoyed me that ready-made costumes are not readily available in plus sizes, unless you want to buy online and pay a fortune.

So if you are interested, or even just a little bit curious, come back tomorrow for Day 1 - Steampunk.


Monday, July 25, 2011

I’m Back….

Not that you knew I was gone. If I had been really organised I could have scheduled posts for while I was away, but I wasn’t, so I didn’t.

Not that much has really been happening. I made a really awesome gift for one of Little Princesses friends who had a birthday party last weekend, but I forgot to take a photo of it. Due to the feedback from other parents at the party, I believe I will be making more in future, so next time I will take a photo. It was an idea I got from here, to make a build-a-fort kit. Mine was slightly different, but along the same lines. Great idea, fairly cheap to put together and a huge hit with parents and kids.

I received a pay-it-forward gift from Angela at Mummyzilla. This gift was a bit unexpected, because I had totally forgotten I had signed up for this pay it forward, so it was a nice surprise.
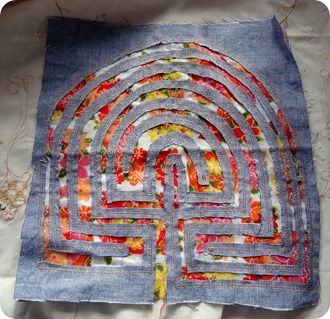
DSC00623

She sent me this Labyrinth square, which could be used for lots of things, but I think I am going to turn it into a cushion. I’ve never seen anything like this, and I think it’s a fantastic idea. It also is a great gift to post, which makes me think that I am thinking too big for the pay it forward gifts I still owe ( I haven’t forgotten about you Kelly, Amaranta and Sandandstarfish).

So, I have just spent the last week down in Napier, but didn’t really do anything blogworthy. Only made it to one opshop, and it was a dud. Since getting back I have been desperately trying to think of ideas for gifts to make for crafty friends whose birthdays are coming up next month. My first idea was based on this link, which I found through Pinterest.

DSC00615DSC00619

I really like this colour combination, grey and mustard yellow, but I’m just not sure about giving something like this as a gift. Just because I like it, doesn’t mean someone else will. So I need your feedback, is a scarf an ok gift to give to someone you don’t really know that well? Do you like these colours together? Would you wear a scarf like this?

The next idea was based on pictures I’ve seen all over blogland, and has been on my mental to-do list for ages, Butterfly Specimen Art. I got a Cuttlebug (YAY!!) in the weekend, with a set of dies which include two butterflies, a bee and a dragonfly.
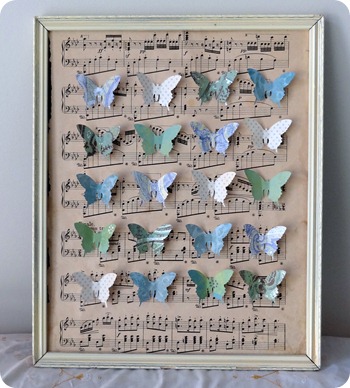
DSC00621

I love how it turned out. I haven’t decided who to give this one to yet, but I am planning to make another one, maybe with bees or dragonflies, I just need to find another frame. Preferably one I don’t have to spray paint, because spray painting is messy! This one was made with stuff I had lying around; an old frame that was a little bit chippy, I just gave it a coat of coffee cream spray paint; a sheet of vintage music; and the butterflies were cut from scraps of scrapbooking papers from my stash.

The only other gift idea I have is some felted soaps, which may be given as a thank you gift rather than a birthday gift. If you’ve got some brilliant ideas for handmade gifts that are fairly cheap and not too difficult, please share. I love making gifts for people, but thinking of new ideas every year is the hard part. Unfortunately, most of the people I make gifts for are from the craft group I go to, so I can’t make the same thing for everyone.

Tuesday, July 12, 2011

Recent Thrifty Finds

I don’t really have anything crafty to show, because all I have been doing for the last few days is housework, in preparation for our rental inspection today. So I thought I would show some of my most favourite thrifty finds from recent op-shopping sprees.

DSC00601

By far my most exciting find this year were these vintage flower frogs. I have been drooling over these on other peoples blogs for a while, thinking I would never find any at the op-shops I visit. So when I found them I just about did a happy dance. They are now living on the windowsill in my craft room, displaying cards I have made.

DSC00598

This egg cup was in a bag with a few other plain metal egg cups, but I had to get the whole bag just so I could have this one. It has the perfect aged patina, and its shape is just gorgeous. I want to make it into a pincushion, but I really don’t need another pincushion, and I don’t want to give it away, so I’m not sure what will happen to it.

DSC00597

Little white metal bucket, looks pretty boring now, but it is destined for a shabby chic makeover.

DSC00600

And this little brooch. I tried to Google it to see if it is vintage, but I couldn't find anything like it. Something about it reminds me of my childhood, so I’m thinking it could be from the 80’s. Is the 80’s considered vintage yet?

It’s been a while, but I’m linking up with a few parties – Apron Thrift Girl , Her Library Adventures & Joyful Treasure Hunting.

Saturday, July 9, 2011

Thrifty Tin Swap Package

Finally I can show you the package I gave to my partner for the Thrifty Tin Swap. My partner for this swap was a friend who goes to/runs the craft groups I go to. It was fun putting a swap package together for someone I know, but also very challenging because we make similar things and have very similar tastes, so I really didn’t want to make her something she could have made herself or seen me make before a million times. I went a bit over the minimum requirements for this swap, but it was so much fun making these things, I couldn’t help myself.

DSC00577

Here is the package, all wrapped up and ready to give.

DSC00557

The first Item I made was this heart. My friend has a “heart wall” in her studio, covered with different handmade hearts she has collected and been given. I had bought this heart frame ages ago at a thrift store, and it had been sitting on a shelf just a plain empty heart for all this time, so when I found out who my swap partner was, I knew it was time for this frame to get a makeover. I modpodged vintage book pages over it, then stuck on some feathers and purple flowers I made, then tied on some black organza ribbon to hang it.

DSC00554


The sweet component of the package was this altered tin, filled with, as it says, mints. I also covered this with vintage book pages, then added some lace and a label.


DSC00578DSC00579DSC00580

I made this little altered bottle, which is filled with an assortment of beads which came from a huge bag I got from a thrift shop. On the top of the bottle is a flower off a vintage clip-on earring. The label is a picture from the graphics fairy and the tag is just out of a packet of diecut tags, I stamped it and used ink to distress the edges.


DSC00581DSC00582

Altered peat pots are something that are all over blogland at the moment, if you follow the kind of vintage, shabby chic awesome blogs that I love. I have had a stack of these peat pots in my stash for years, with no idea what to do with them (I am NOT a gardener), but knowing they would be useful one day. So when I first saw someone doing this, I thought wow, why didn’t I think of that. I knew I wanted to include some vintage lace in the package, but wasn’t sure how to present them. A few wooden pegs and an empty thread spool just happened to fit perfectly into a peat pot. To decorate the pot I wrapped around some lace, tied a bow with some tea dyed seam binding, hung a tag that I added the word Make to and used ink to distress the edges a bit, tied on with a bit of twine.

DSC00556

This was the “thrifted gift” part of the package. I bought this from the thrift store because I loved it, but then when I found out who my partner was, I thought she would love it even more, and I could imagine it fitting in perfectly in her gorgeous studio. It is a very small cake stand type thing, with little feet on the bottom. I can imagine this having so many uses, including holding small cakes, but also as a candle stand, a jewellery holder, an anything pretty holder…

It was all packaged in a vintage tin, with a tag I made a while ago. I think this will be the last swap I join, at least for a while.

